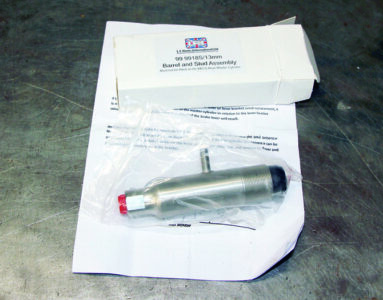
This motorcycle front brake master cylinder rebuild uses a conversion kit by LF Harris to easily get a more responsive front brake on your classic British bike.
If you feel like we’re overdoing the brake work here, you might be right. Brakes are boring, but efficient stopping is probably more important than fast acceleration, especially on a vintage motorcycle.
Early versions of disc brakes on British bikes suffer from bad hydraulic ratios, among other problems like chrome plating and solid rotors. Bad hydraulic ratios lead to the common complaint that the brake feel is bad, requiring too much effort to get good stopping power.
An easy and available fix is to drop the master cylinder size from 5/8-inch diameter to 1/2-inch diameter. Sleeving is also an option, but a built to purpose 1/2-inch cylinder is far better.
This How-To will cover rebuilding a common threaded British master cylinder to the smaller diameter version. As always, it’s good to have a factory shop manual on hand, just in case. Let’s jump in and get started.

We’re using the 1/2-inch master cylinder conversion kit by LF Harris, which we sourced from The Bonneville Shop. It’s completely self contained. You don’t have to do any plunger and seal fitting so it’s an easy change.

We start by removing the banjo fitting at the end of the old master cylinder using a 5/8-inch wrench. Be careful not to get any brake fluid on painted parts.

Once the brake line is removed, a Phillips head screwdriver will work to remove the switch cluster from the brake assembly. These are Posidrive screws and will usually be damaged by years of Phillips screwdriver abuse.

Be careful not to break the wires connecting the brake switch to the switch cluster. Remove the screw holding the brake switch assembly to the brake lever and snake the switch out of the lever assembly.

Well, that old master cylinder has been leaking for some time. There’s a lot of brake fluid residue to clean out. Now that the brake cylinder has been freed from the switch cluster we can move on to the bench and disassembly.

There’s plenty more crusty brake fluid debris inside the housing.

Remove the reservoir cap and drain the reservoir. Using a 7/16-inch socket, remove the nut holding the reservoir to the cylinder. Remove the reservoir, noting the order of assembly of the O-ring seal, sleeve, washer and locknut for later reassembly.

Using a 3/32-inch Allen wrench, remove the grub screw holding the cylinder to the housing. You may need to use a pencil torch to heat the housing if Loctite was used to retain the screw.

After removing the grub screw, unscrew the old master cylinder and discard it. That old housing could use a refresh, so we’ll go ahead and remove the lever so we can paint it black. The 7/16-inch socket comes in handy again for this task, along with a large Phillips screwdriver.

We’ll begin the cylinder reassembly by putting the reservoir back on the cylinder. This is the sleeve that was referenced earlier. It’s there to prevent crushing the reservoir by over tightening the locknut.

Set the reservoir over the sleeve and check the orientation. The reservoir should lean away from the lever end of the cylinder. When you’ve got it right, put the O-ring back on the bottom of the reservoir.

Once you’re sure you’ve got the reservoir oriented correctly, add the washer and locknut and tighten with the 7/16-inch socket wrench.

Move on to assembly of the lever into the housing. A little silicone grease helps keep the crud at bay.

Insert the lever back into the newly repainted housing.

Insert the lever screw into the housing and snug it down. Hold the screw in place while using the 7/16-inch wrench to tighten the locknut.

Now we’re ready to install the new master cylinder into the housing. This will be the only technically challenging part of this job.

It’s important to get the depth of the new master cylinder in the housing set correctly. Too little depth and the lever contacts the handlebar before you get good braking. Too much depth and you run the risk of blocking the relief port in the master cylinder. If you do this you will have brakes that apply and don’t release, a very dangerous combination. Start by screwing the cylinder in until all the free play between lever and cylinder is eliminated. Screw the cylinder in and out until you’re sure you’ve got it right.

When you’re sure you’ve got all the free play removed, screw the cylinder in one more full turn from that point. Continue turning in until the reservoir lines up with the tapped boss for the rear view mirror. Don’t unscrew it, turn it in even if it’s nearly another 360 degrees. From here, turn it in the final distance necessary for the slot in the cylinder to line up with the hole for the set screw. Once you’re satisfied with your work, install the grub screw with a little blue Loctite and snug it down.

As a final check before reinstalling the cylinder on the bike, put brake fluid in the master cylinder until there is just enough in there to cover the locknut. Using low pressure air, blow into the brake line end of the master cylinder. There should be bubbles in the reservoir, proving that you haven’t covered the relief port. After that, carefully reassemble the switch cluster to the brake cluster, re-attach the brake lines, fill the master cylinder and bleed the brakes. Enjoy your new more responsive front brake!


